Basic rule of life: if you don't move, things are going to get pretty tough up the road... Now different creature and inventors found various way to solve that issue. To each hardware solution come a different software solutions; you don't control a car, a 4 leg robot or a rocket the same way. In this section we'll discover how to make your robot move and race for the stars. In this section, we will use this setup with varying circuits.
a) Acting: One robot, two wheels
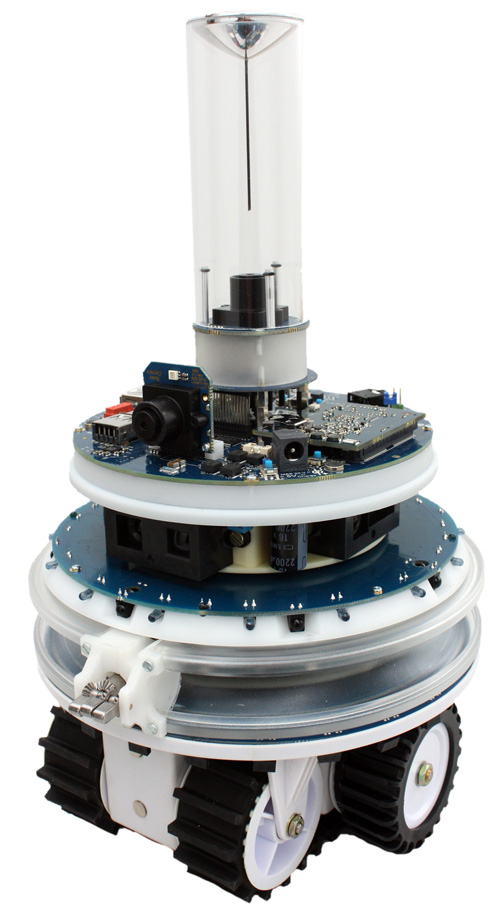
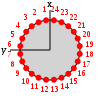
Actually, they are treels, a portmanteau neologism of wheels and trails. But for all your concern, you can see the robot as two wheels along the horizontal axis. Controlling your robot movement will go through setting the speed of each of those wheels. For that we use the robot.wheels.set_velocity(leftSpeed, rightSpeed) function which accept two values (yep, left and right speed) as parameters, both measured in cm/s. Positive values will make wheels roll forward, negative will make them roll backward. For instance, let's make monomaniac robots:
-- You will most of the time modify the step function
function step()
  robot.wheels.set_velocity(20,20)
end
Is this this simple to control your robot? Yes it is. Try out various speed for each wheels to get a feeling of how the robots is moving. For instance:
- moving straight and frontward is leftSpeed = rightSpeed. Try
robot.wheels.set_velocity(20,20). - turning right is leftSpeed > rightSpeed. Try
robot.wheels.set_velocity(10,20). - turning on your self is leftSpeed = -rightSpeed. Try
robot.wheels.set_velocity(20,-20).
While your moving is aimless for now, you can already think of a few stuff to do with it. Try to draw shapes with your robots for instance (while circle are pretty straight forward, try to draw triangles or more complex shapes!).
By the way, here we told that the code must go in the step function (usually the case). It'll be up to you usually to understand where to put the code (not too complex, I assure you) so you'll need to think if the code is meant to be executed once (in inti()) or constantly (in step()).
While setting directly the wheels' speed does the job, it's not really practical. If the robots think it terms of left and right speed, we don't really. We would be more used to think in terms of moving forward/backward and turning, like when driving a car. So, we want to feed the robot forward speed and an angular speed, and it to translate it to left wheel speed and right wheel speed. Any idea? Try to imagine if you have only forward or angular, and then compose the two of them. Below are a possible solution, don't look at it before you've tried out a little bit by yourself! To make it easier to use, we formalized it as a function. A good time if ever to see how they are coded in Lua!
function driveAsCar(forwardSpeed, angularSpeed)

  -- We have an equal component, and an opposed one
  leftSpeed  = forwardSpeed - angularSpeed
  rightSpeed = forwardSpeed + angularSpeed

  robot.wheels.set_velocity(leftSpeed,rightSpeed)
end
Pretty good. You can already use this formalism to get a better control over the robot. But we don't want to pilot our robots as a car (from the inside) we want to give him orders (from the outside). We'll see later on even better ways to command the robot. For now, we have more important issues, our robot is ... a bit blind.
b) Sensing: Invisible touch
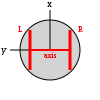
Don't take me wrong, I love driving straight in walls as much as the next guy, but it doesn't really scream "intelligence". Let's try to level with a two years old and learn how to detect object and avoid them. For that purpose, the robots are equipped with proximity sensors that reacts to physical object on a 10cm range. There are 24 of them, spread in a ring around the robot body. Each readings is a table composed of an angle in radians and a value between 0 and 1. The angle defines the position of the sensors around the robot and the value is as high as the object is close (0 means nothing is detected). They are all contained in the robot.proximity table and can be accessed as follow:
log("--Proximity Sensors--")
for i = 1,24 do
    log("Angle: " .. robot.proximity[i].angle ..
        "Value: " .. robot.proximity[i].value)
end
Ok, text log are pretty greate (they are), but are lacking a bit when you prefere overall view over precision. When you want the later, you might want to display the rays of the sensors. How? Well it's explained in the setup ref material!
On of the most common usage for the proximity sensors is to avoid obstacles (object, walls, other robots...). We will see in next section a better way to use such information, but we can already make something simple out of it. Can you imagine what you need to do if you want to avoid obstacles, or at least react and turn in the right direction when encountering them? Try out by yourself, and once satisfied with the result you can compare your code to the following proposition:
sensingLeft = robot.proximity[3].value + robot.proximity[4].value +
              robot.proximity[5].value + robot.proximity[6].value

sensingRight = robot.proximity[22].value+ robot.proximity[21].value +
               robot.proximity[20].value + robot.proximity[19].value

if( sensingLeft ~= 0 ) then
  driveAsCar(7,-3)
elseif( sensingRight ~= 0 ) then
  driveAsCar(7,3)
else
  driveAsCar(10,0)
end
Great, now your robot can behave as brownian particle. You must (or at least should) be so proud of it. Well, anyway, if love is blind, so is your robot right now. Let's change that. A bit. A liiiiitle bit.
c) Sensing: ground color
Don't expect 20/20 vision right from the start. Especially that our robots are meant to work as a team. As such, they are not pumped up with sensors all around and heavy computing power. They are simple (who said stupid?!) robots, with local sensing. And we'll get as local as one can get: watching the ground under your own feet (well, treels). Or more precisely, detecting gray level of the ground's color. This is very useful for reading marks on the ground, would that be for communication purpose, to emphasize areas of purpose, to guide robot over a path...
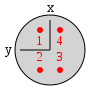
The robot have 4 grounds sensors on its lower part, each reading the brightness of the ground under them. They output a value between 0 and 1; 0 for black and 1 for white, shades of gray for values in between. Each readings is a table composed of value an offset. The value refers to the brightness and the offset to a vector for the position of the specific sensor stemming from the center of the robot. Since we have 4 sensors, we have 4 of those readings. They are all contained in the robot.motor_ground table and can be accessed as follow:
log("--Ground Sensors--")
for i = 1,4 do
    log(robot.motor_ground[i].value)
    log(robot.motor_ground[i].offset.x .. " " ..
        robot.motor_ground[i].offset.y)
end
In this section's area are a few patterns on the ground, any idea on how to make your robot avoid them? Or get to them and stop? First you'll need a robot that will explore a bit by itself. We'll study this point better in next section, but you can already mash up something together with the robot.random.uniform(min, max) function. Try to implement one of both algorithm by yourself. Below is a solution for the stopping one:
onSpot = true
for i = 1,4 do
    if( robot.motor_ground[i].value < 0.90 ) then -- not on a white spot
      onSpot = false
    end
end

if(onSpot) then
  driveAsCar(0,0)
else
  driveAsCar(robot.random.uniform(10,20), robot.random.uniform(-10,10))
end
Ok, this is working but we have definitely too many robots trying to form platonic relationships with the arena walls. If not done already, you should mix that behavior with the avoiding one. Hard to mix both of them? Damn right it is, but lucky us, we'll see in next section a glorious way to do so.
d) Behaving: Follow the line
Ok, that is great. You can move, you can see where you are moving. What about coupling both and making you move following marks on the ground? This is actually a very classic algorithm which is solved both by first learners and highly skilled engineers, depending on the environment and precision/speed required. Our job is simple: we have a line, we want to follow it, when it's straight (simple!) and when it's turning (ergh...).
-- OK, weirdly, for that one, left and right speed was more practical...
-- Try to redo it with the car metaphor!

leftSpeed = 5
rightSpeed = 5

if(robot.motor_ground[1].value < 0.40) then -- something on my left
  rightSpeed = -3
end

if(robot.motor_ground[4].value < 0.40) then -- something on my right
  leftSpeed = -3
end

robot.wheels.set_velocity(leftSpeed, rightSpeed)
Neato but ... hey, this is a rip off, it's only working if the shape is convex! Well, all intelligence has its down. But why not giving a perfect solution? :( Well, first of all, you could say please. Second, I got something better: a game (or research, if you find it more sexy). Sometimes there is not one clear solution and that's when there is competition. Which is super good for the bettering of the human knowledge. And also great to watch while getting some pop corn. Your job now is actually to better this behavior. Enough copy pasting (yep, we saw you!), now it's time to work it out!
e) Playing: Everybody race now!
Did the joke on copy pasting work? Anyway... As said, your job is to think of a behavior now (as in all following Playing sections). While you might get lost and search online, try your best to get new ideas and all, don't forget one reference: this workshop. It's not finished, far from it. You might have later one some useful tip to make your behavior even better!
Our aim is to start a new genre of gaming, so no better time than now. Once your AI coded make it combat another AI by charging it and instantiating associated robots. My goodness, can one really do that? Yes we can, and it's covered here.
You have know all the basic tools at hand to play this racing game. For circuits, you can have a look at all provided. Don't hesitate to create your own by drawing over the background picture with your favorite image editor. How to add it up and modify the size of the arena up? All told in your favorite reference material!. Create the best AI to follow the track, modify on the fly its behavior would the line be long or very sneaky, keep in memory the places where you can go full speed and much much more to get the best time lap.