NOTE: don't modify the values of the
robot attributes. More specifically:
- Never write directly into the
robotattributesrobot.proximity[4].angle = 1.67 -- NO!
- Never apply operations such as
table.sort()to therobottabletable.sort(robot.proximity, function(a,b) return a.value > b.value end) -- NO!
- If you intend to use the values of a
robottable, copy that table first:myprox = table.copy(robot.proximity)table.sort(myprox, function(a,b) return a.value < b.value end)
robot.base_ground |
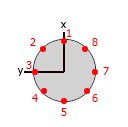
The base ground sensor reads the color of the floor.
It is a list of 8 readings, each containing a table composed of
value and offset. The value is either 0 or 1, where
0 means black (or dark gray), and 1 means white (or light gray). The offset
corresponds to the position read on the ground by the sensor. The position is
expressed as a 2D vector stemming from the center of the robot. The vector
coordinates are in cm.The difference between this sensor and the robot.motor_ground is
that this sensor returns binary readings (0 = black/1 = white), while
robot.motor_ground can distinguish different shades of gray.
|
 |
robot.distance_scanner |
The distance scanner is a rotating device with four sensors. Two sensors are
short-range (4cm to 30cm) and two are long-range (20cm to 150cm). Each sensor
returns up to 6 values every time step, for a total of 24 readings (12 short-range
and 12 long-range). Each reading is a table composed of angle in
radians and distance in cm. The distance value can also be -1
or -2. When it is -1, it means that the object detected by the sensor is closer
than the minimum sensor range (4cm for short-range, 20cm for long-range). When
a sensor returns -2, it's because no object was detected at all.This device is initially off. You need to use the enable() function
to switch it on. The function disable switches it off.
The function set_angle() locks the device at a specific angle, while
set_rpm(s) sets the angular speed of the device to s
(which must be a number). If you want to convert from radians per second to
RPMs, apply the following formula: RPM = 30/pi * radsec.
|
|
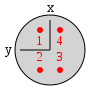
robot.gripper |
The gripper allows a robot to connect to objects such as boxes and cylinders, or
other robots. A robot attached to a passive object can transport it, if it is
light enough. To lock the gripper, you use lock_positive() or
lock_negative(). They both do the same job, so you can call the one
you prefer. To unlock the gripper (thus releasing the attached object), use
unlock().
|
 |
robot.id |
A string containing the id of the robot. | |
robot.leds |
Sets the color of the robot LEDs. The robot has a total of 13 RGB LEDs. 12 of them
are arranged in a ring around the robot body, and one (also called the
beacon) is positioned at the top of the robot body. To set the colors of a single LED, use set_single_color(idx, color).
idx is the number of the LED to set (1-12 for the body LEDs, 13 for
the beacon). color can be expressed as a string, such as
"red", "green", "blue", etc., or as a
triplet of numbers r,g,b.To set all colors at once, use set_all_colors(color). The
color parameter works like set_single_color(idx, color).
|
 |
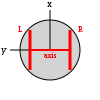
robot.light |
The light sensor allows the robot to detect light sources. The robot has 24
light sensors, equally distributed in a ring around its body. Each sensor reading
is composed of an angle in radians and a value in the range
[0,1]. The angle corresponds to where the sensor is located in the body with respect
to the front of the robot, which is the local x axis. Regarding the value,
0 corresponds to no light being detected by a sensor, while values > 0 mean that light
has been detected. The value increases as the robot gets closer to a light source.
|
 |
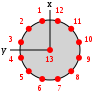
robot.motor_ground |
The motor ground sensor reads the color of the floor.
It is a list of 4 readings, each containing a table composed of
value and offset. The value goes from 0 or 1, where
0 means black, and 1 means white. The offset corresponds to the position read
on the ground by the sensor. The position is expressed as a 2D vector stemming
from the center of the robot. The vector coordinates are in cm.The difference between this sensor and the robot.base_ground is
that this sensor can distinguish different shades of gray, while
robot.base_ground returns binary readings (0 = black/1 = white).
|
 |
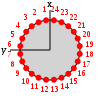
robot.proximity |
The proximity sensors detect objects around the robots. The sensors are 24 and are
equally distributed in a ring around the robot body. Each sensor has a range of 10cm
and returns a reading composed of an angle in radians and a value
in the range [0,1]. The angle corresponds to where the sensor is located in the body with
respect to the front of the robot, which is the local x axis. Regarding the value,
0 corresponds to no object being detected by a sensor, while values > 0 mean that an object
has been detected. The value increases as the robot gets closer to the object.
|
 |
robot.random |
This table offers a set of functions to draw random numbers from a distribution. Use bernoulli() to get either 0 or 1 from a
Bernoulli
distribution with p=0.5. You can also write bernoulli(p) to set
a different value for p.Use exponential(m) to get a random number from an
exponential
distribution with mean m.Use gaussian(s) to get a random number from a
Gaussian
distribution with standard deviation s and zero mean. You can also
write gaussian(s,m) to set a non-zero mean.Use uniform() to get a random number from a
uniform
distribution in the range [0,1). Alternatively, you can use uniform(max)
to get a number between 0 and max, or
uniform(min,max) to get a number between min and
max. If you want integer numbers, use the functions
uniform_int(max) and uniform_int(min,max).
|
|
robot.range_and_bearing |
The range-and-bearing system allows robots to perform localized communication.
Localized communication means that a robot, upon receiving data from another robot, also
detects the position of the sender with respect to its local point of view. It is important
to notice that the range-and-bearing system is not like WiFi. First, because two robots can exchange
data only if they are in direct line of sight - if an object is between two robots, the robots
can't communicate. Second, because robots that send data can only broadcast it in a limited area -
you can't pick who you talk to as you would with an IP address. Third, the robots can exchange only
10 bytes of data. To set the data to broadcast, use set_data(). This function accepts input in two forms.
You can write set_data(idx, data), and this means that you set the idx-th
byte to the value of data. data must be a number in the range [0,255].
Alternatively, you can write set_data(data), where data must be a table
containing exactly 10 numbers in the range [0,255].At each time step, a robot receives a variable number of messages from nearby robots. Each message is stored in a table composed of data (the 10-bytes message payload),
horizontal_bearing (the angle between the robot local x axis and the position
of the message source; the angle is on the robot's xy plane, in radians),
vertical_bearing (like the horizontal bearing, but it is the angle between the message
source and the robot's xy plane), and range (the distance of the message
source in cm).
|
|
robot.wheels |
The real robot moves using two sets of wheels and tracks called treels. For simplicity,
we treat the treels like normal wheels. To move the robot, use set_velocity(l,r) where l and r are
the left and right wheel velocity, respectively. By 'wheel velocity' we mean linear velocity.
In other words, if you say set_velocity(5,5), the robot will move forward at 5cm/s.You can get some information about robot motion and wheels, too. axis_length is the distance
between the two wheels in cm. velocity_left and velocity_right store the current
wheel velocity. distance_left and distance_right store the linear distance
covered by the wheels in the last time step.
|
 |
robot.turret |
The foot-bot gripper is attached to a rotating device called the gripper. You can control the gripper
by either setting its rotation, or its rotational speed. To set its rotation, you must first call the
method set_position_control_mode() to switch the gripper to position control mode, and then
call set_rotation(angle) to rotate the gripper at angle angle. Alternatively,
you can set the rotational speed by calling set_speed_control_mode() first, and then
set_rotation_speed(speed). With set_passive_mode() you instruct the gripper
to be in a state in which, as the robot moves with an object gripped, the turret rotates due to the
weight of the gripped object.
|
|
robot.colored_blob_omnidirectional_camera |
This device returns a list of colored blobs, along with their position with respect to the robot center.
A colored blob in ARGoS corresponds to an LED. The list of blobs varies in size over time, depending on
what the robots sees. To start collecting data, you need to call enable(). To stop, call
disable().
|