You know us, we know you: let’s get this party started.
What is OpenGL/WebGL?
I’d answer “WebGL is what we’ll use in this workshop” but I’m unsure how happy you’ll be with the answer. Joke aside, OpenGL is an API (application programming interface) which connect two things. The first is your code, which is executed on your main processor; the second is your graphic card. In short, OpenGL let you render graphics on your screen by accessing directly the graphic card (hardware accelerated graphics) as opposed to draw from your main processor, thus maximizing the performances.
WebGL as a few might have already guessed is the twin of OpenGL, but on the web. It’s a very similar API, specifically for the programming language used on the web: JavaScript. While both are not completely equivalent, let’s say that if you know one, you know the other.
While OpenGL/WebGL is a whoooole world to discover, with bumps and heavy rides, we’ll try to give you a gentle introduction here. You’re aim is twofold. First get a hang on the API, draw your first shape, play with it, start mapping the real of graphical possibilities. Second is to allow you to be self sufficient and to start building your own project.
Setting up
So, in case you haven’t followed, we’ll be drawing stuff on the web, hence using a web browser, JavaScript and WebGL. The linguist will have found out by themselves that JavaScript is a scripting language. It means it doesn’t need to be compiled and translated in machine code. This allows for many thing, and among other: hot reloading. This means that you can write your code, and see in (pseudo) real time the modification. A blessing for students and teachers alike.
Many different ways to do so. Our weapon of choice will be JSbin (https://jsbin.com/?html,output). It is an online editor (HTML, JavaScript, CSS. All we need!) with this hot reloading feature. When you will start writing some code, you will see a specific URL popping up in your address bar, such as : https://jsbin.com/kadovifuha/edit?html,css,output . Be sure to write down the weird name just after jsbin.com, it will be a unique identifier to get back later to your code.
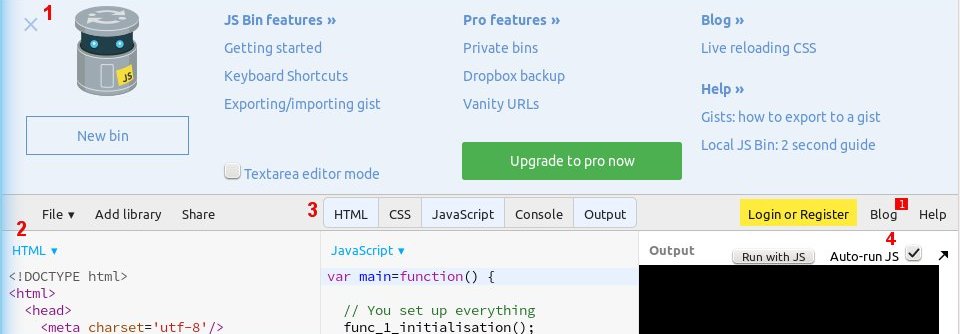
A few helping points to get you started (each are linked with a red marker of the corresponding number)
- The big header is a bit of a bother. Click on that cross to make it smaller;
- Line numbering is easier for communicating about code. Double click on HTML and make them appear;
- You see two frames: HTML, and Output. The little buttons at the right of the red 3 allows you to juggle between those and other frames. We will only use the HTML frame for our code. Output will be where we’ll render, and Console might give interesting debugging messages.
- Your code is updated live. If you don’t want, you can just check out of “Auto-run JS” and if you want to see your result full screen, just click on the arrow pointing to the upper right.
Running your first program
Enough talk, let’s rock. First, we’ll create our web page in HTML and make it access our JavaScript file. That’ll be more or less all that our HTML will be doing, everything else will be done in JavaScript.
If you know a bit HTML, nothing will be of a surprise here. If you don’t … you might want to check it out elsewhere later because it’s out of scope of this workshop :p In short, we create a HTML document. In the header we first import a library and create a place with the JavasScript code you’ll be typing yourself, for now only a function called main. Then we just style a bit the body, create a canvas where we’ll be drawing and ask to call the previously defined main() function when the body will have finished loading.
<!DOCTYPE html>
<html>

  <head>
    <!-- Our helper library -->
    <script type="text/javascript" src=
    "https://opentechschool-brussels.github.io/intro-to-webGL-and-shaders/src/lib.js">
    </script>
    <!-- Another library, for math stuff -->
    <script type="text/javascript" src=
    "https://opentechschool-brussels.github.io/intro-to-webGL-and-shaders/src/J3DIMath.js">
    </script>

    <!-- Where your code will be -->
    <script type="text/javascript">
    var setup=function() { // Defines the function you'll call when body finish loading

    };
    </script>
  </head>


  <body style='margin:0px' onload='setup()'>
    <canvas/ id='my_canvas' style='position: absolute; background-color: black;'>
  </body>

</html>
Right now you’re not doing much, but you’re doing it. The library you have imported was made to allow you to quickly draw a triangle, and only that. The first aim of the workshop will be to get rid of the library steps by steps. First we’ll get a description of those steps, then we’ll code them one by one, granting us more expressiveness along the way.
So, right now, let’s just call the top level function defined in our library: OTSHelper_doAll('my_canvas') which … does it all. The code below does just that. Just write that in the setup function, and you should see a little triangle appear in the output frame. As an added bonus, this is a confirmation that WebGL is working on your web browser. Give your self a tap on the back, a bit more reading, and we’re settled for the real stuff.
CPU / GPU
CPU stands for Central Processing Unit, the default stuff that thinks when you give an order, a task, execute some code… GPU stands for Graphical Processing Unit, the twin of the CPU, mostly used for rendering graphics (but not only. Curious he?). Each processing units behave in a different way, our job here will be to learn the specificities of the GPU.
The Web part of it
In this workshop, we chose WebGL instead of OpenGL for numerous reasons. Among others was to allow you to easily share your results. While JSBin is super nice for fast prototyping, you might want to host your code somewhere more classic. There are numerous free static server provider available online (like neocities), you might want to check that after the workshop.