On getting some control over those damn shaders
In order to animate your shape, you’ll need to use some time value to synchronize too. Unfortunately, we don’t have that in shaders themselves, so how can we still do that? Well, you remember we shared some position value to our shader right? Time to send other kind of stuff. For that, we will use uniforms, they are variables of which value is constant for every vertex or fragment but defined in your JavaScript code (so on your CPU). Let’s use that to change the position and the colors of our shape.
Let’s control the red color component with a uniform. In our fragment shader, we will just need to define a new variable, with the uniform type qualifier.
<script id="fshader" type="x-shader/x-fragment">

    // here we declare our uniform
    uniform lowp float u_redColor;

    void main(void) {
        gl_FragColor = vec4(u_redColor,0.6,0.9,1.0);
    }
</script>
So, now we’re trying to use a variable we haven’t sent already. Let’s resolve that issue. Setting the value of a uniform in your JavaScript is almost straightforward (at least in OpenGL standard!), and bear a liking with how we handle our past attribute variable.
As can be read below, we first get the location of the variable in the shader with the function getUniformLocation. We then update it then with the function uniform1f.
var redColorLevel = 1.0;
var redColorUniformLocation = GL.getUniformLocation(shaderProgramID, "u_redColor");
GL.uniform1f(redColorUniformLocation,redColorLevel);
You should obtain a beautiful pink shape.
Bit of animation, and how to control this mess
You’re controlling the color, true, but it’s not dynamic. Not yet. For that, we hav two options: either animate it, or let you control it. Lucky you, we’ll see both.
First, let’s animate it. For that we’ll use the current time to change the color. Date.now() gives us then umber of milliseconds since … a long time ago (since when? well, the UNIX epoch, it being 1/1/1970). But what matters for us is that it’ll grow as time pass, making it a nice counter to use. Then a bit of trigonometry (don’t flee!) and we’re all set.
var timeSecond = Date.now() / 1000;

var redColorLevel = (Math.sin(timeSecond)+1)*0.5;
var redColorUniformLocation = GL.getUniformLocation(shaderProgramID, "u_redColor");
GL.uniform1f(redColorUniformLocation,redColorLevel);
The square now changes slowly its color from pink to blue periodically. Amazing.
What you say? We told you about controlling it too? Pretty demanding aren’t you? But we love to deliver, so here you go. The basic here is just to get a controller, link it to a JavaScript value, send it as a uniform, and you’re done. If you know a bit of JavaScript, go crazy. If not, below is a code that allows you to get your mouse position. Up to you to then link that with your uniform variable!
First you need to modify your body tag by adding a new callback on a function whenever the mouse move. Let’s call that function showCoords.
<body style='margin:0px' onload='setup()' onmousemove="showCoords(event)">
Then we need to define that function, putting it at the root of our JavaScript code. This function get the mouse position from the event that triggered it (and print it if you uncomment the line).
function showCoords(event) {
    mouseX = event.clientX;
    mouseY = event.clientY;
//    console.log("X coords: " + x + ", Y coords: " + y); // for debugging
}
Then, it’s just a matter of using mouseX & mouseY any way you see fit. Enjoy!
Make it move!
A colored square is cool. But you know what’s even cooler? A rotating color square! In order to do that, we’ll use of course a uniform, but for a type we haven’t seen already: a matrix. A matrix is a rectangular array of numbers (think both columns and rows). Like the vector, it can have varying dimension. Matrix maths can be pretty rough at first, but we’ll see only a few specifics, and there will be a library to help us along the way.
First, let’s define the uniform matrix in our shader. This matrix will be a geometrical transformation matrix. In order to apply it to our position vector, we need to multiple our matrix by the vector (and not the opposite!). For that multiplication to be legit, both vector and matrix should be of the same dimension (it being 4 in our case).
<script id="vshader" type="x-shader/x-vertex">

    attribute lowp vec3 position;
    uniform mat4 u_transformMatrix;

    void main(void)
    {
        gl_Position = u_transformMatrix * vec4(position,1.0);
    }
</script>
Our position vector (x,y,z,w) is now multiplied by a 4x4 matrix. Geometrically speaking, this allows almost any kind of scale, rotation and translation. Let’s now define the matrix in our JavaScript code. While doing it by hand could be fun (spoiler alert: it’s not), we’ll use a library (J3DIMath) to abstract the heavy lifting as shown in the code below.
var angle = Date.now()/1000;

// create a new identity matrix
var transformMatrix = new J3DIMatrix4()

// add rotation around x,y,z
transformMatrix.rotate(angle, angle*0.3+30, 0);

// Deal with the uniform variable
var transformMatrixLocation = GL.getUniformLocation(shaderProgramID, "u_transformMatrix");
GL.uniformMatrix4fv(transformMatrixLocation,false,transformMatrix.getAsFloat32Array());
So, we used J3DIMath here to create a matrix representing a rotation. If you want to know what other transform you can do, you can check it here.
Send additional vertex informations
Until now, (despite a little past shortcut), our colors are uniform which should not be the case in complex shapes. Depending on the faces or vertex, you should have variations in colors. In order to do so, we’ll add one information to the vertex that will represent its color.
This information will be shared through the vertices, so accessed by the vertex shader. This means we need a new attribute variable (we’ll call it color). This won’t be used here, but needs to be passed to the fragment shader. While one might think that a uniform type qualifier would do, here the value is different depending on the vertex and needs to be interpolated between them. To specify that behavior, we need to use the varying type qualifier on another variable (here called V_Color) and affect to it the received color value.
Here is what it looks like.
<script id="vshader" type="x-shader/x-vertex">

    attribute mediump vec3 position;
    attribute lowp vec3 color;

    uniform mat4 u_transformMatrix;

    varying lowp vec3 v_Color;

    void main(void) {
        // forward the color to the fragment shader
        v_Color = color;
        gl_Position = u_transformMatrix * vec4(position,1.0);
    }

</script>
Now we need to define our varying variable in the fragment shader too, and then use it. Nothing too fancy here.
<script id="fshader" type="x-shader/x-fragment">

    precision mediump float;

    // here we declare our uniform
    uniform lowp float u_redColor;
    varying vec3 v_Color;

    void main(void) {
        // the final output is the color received with the varying v_Color
        gl_FragColor = vec4(v_Color,1.0);
    }
</script>
Like our previous position attribute, this new attribute must be activated.
var colorAttributeLocation = GL.getAttribLocation(shaderProgramID, "color");
GL.enableVertexAttribArray(colorAttributeLocation);
Now it’s time to do as we did for the position: create a VBO which this time will contain the color information.
var vertexColorArray = [
    1,0,1, //bottom left
    1,1,1, //bottom right
    1,1,0, //top right

    0,0,1, //top left
    1,0,0, // top right
    0,1,0, // bottom left
];

// create an empty buffer object
vertexBufferColorID= GL.createBuffer ();

// bind to the new buffer object
GL.bindBuffer(GL.ARRAY_BUFFER, vertexBufferColorID);

// send data to the new buffer object
GL.bufferData(GL.ARRAY_BUFFER,
            new Float32Array(vertexColorArray),
            GL.STATIC_DRAW);
This works exactly like the vertex position buffer. * We manually define a data array with our colors (R,G,B); * We create an empty VBO; * We fill it with our color array.
We still need to link our attribute color to this new VBO. Let’s do this in the draw function. Add this code before the drawArrays call.
GL.bindBuffer(GL.ARRAY_BUFFER, vertexBufferColorID);
var colorAttibuteLocation = GL.getAttribLocation(shaderProgramID, "color")
GL.vertexAttribPointer(colorAttibuteLocation, 3, GL.FLOAT, false,0,0) ;
And now you should obtain a beautiful multicolor quad. Why? We only defined color for our 6 vertices. And these colors have been interpolated for each pixel drawn in the triangles defined by these vertices, thanks to the magic “varying” variable.
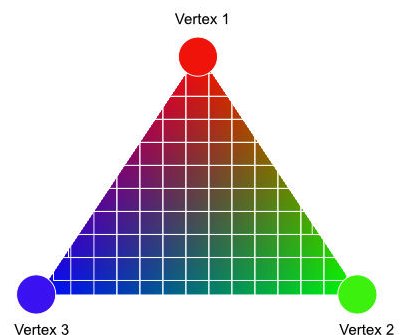
That’s a fundamental concept to understand. The fragment shader takes data produced by the vertex shader and interpolate them for each fragment.
Let’s do a cube!
Triangles to cube. Simple. Nice. Good for your health. ‘nuff said.